Monday, November 23, 2015

Wildfly 9 - Execute Batch Jobs from a JAR in a WAR

It's very common to package Java EE JSR-352 batch jobs and artifacts in a JAR file, and execute the jobs in a web application with the JAR as a dependency. In Wildfly 9, due to the Class Loading based on JBoss Modules and an issue in Wildly 9, you might end up with an exception: javax.batch.operations.JobStartException: JBERET000601: Failed to get job xml file for job XXX.

This post is about how to execute Java EE JSR-352 batch jobs from a JAR file in a WAR archive on Wildfly 9 particularly.

META-INF/batch-jobs in the WAR

In the WAR archive, make sure you have a META-INF/batch-jobs directory. It goes under the WEB-INF/classes directory in a WAR archive. If you don't really have any job XML files in this directory, put a README file for example to make sure it's not empty in order to avoid being ignored by the packaking tool.

WEB-INF/beans.xml in the WAR

If you are using CDI for job artifacts in the WAR, make sure you have a beans.xml file for CDI under the WEB-INF directory. This is the trigger which leads Wildfly implicit module dependency to CDI subsystem being added.

META-INF/batch-jobs in the JAR

In the JAR file, you need storing the job XML documents under the META-INF/batch-jobs directory of course.

META-INF/beans.xml in the JAR

If you are using CDI for job artifacts in the JAR, you should have a CDI beans.xml file under the META-INF directory in the JAR. This will ensure Wildfly will scan the JAR for job artifacts. This is optional for some deployments though.

META-INF/services/org.jberet.spi.JobXmlResolver in the JAR

As a workaround for Wildfly 9 particularly, you need place a service provider configuration file in the resource directory META-INF/services in the JAR, with the name org.jberet.spi.JobXmlResolver. The configuration file contains only the following line:

org.jberet.tools.MetaInfBatchJobsJobXmlResolver

This service provider configuration file will ensure Wilefly 9 to scan the META-INF/batch-jobs directory in the same JAR file for job XML documents.

Resources

Thursday, November 5, 2015

JPA Inheritance and SQLException: Parameter Index Out of Range

JPA (Java Peristence API) supports inheritance. When working with the SINGLE_TABLE or JOINED mapping strategy, the @DiscriminatorColumn annotation (or discriminator-column element if you are using XML mapping descriptor) is used to specify the name of the type discriminator column. This colummn will not be mapped to any field in any of the classes in the entities hierarchy. If you do so, you might encounter the SQLException: Parameter index out of range. I'm using MySQL and Hibernate, the stack trace looks like this:

Caused by: org.hibernate.exception.GenericJDBCException: could not insert: [...]
    at org.hibernate.exception.internal.StandardSQLExceptionConverter.convert(StandardSQLExceptionConverter.java:54)
    at org.hibernate.engine.jdbc.spi.SqlExceptionHelper.convert(SqlExceptionHelper.java:126)
    at org.hibernate.id.insert.AbstractReturningDelegate.performInsert(AbstractReturningDelegate.java:65)
    at org.hibernate.persister.entity.AbstractEntityPersister.insert(AbstractEntityPersister.java:3032)
    at org.hibernate.persister.entity.AbstractEntityPersister.insert(AbstractEntityPersister.java:3556)
    at org.hibernate.action.internal.EntityIdentityInsertAction.execute(EntityIdentityInsertAction.java:97)
    at org.hibernate.engine.spi.ActionQueue.execute(ActionQueue.java:480)
    at org.hibernate.engine.spi.ActionQueue.addResolvedEntityInsertAction(ActionQueue.java:191)
    at org.hibernate.engine.spi.ActionQueue.addInsertAction(ActionQueue.java:175)
    at org.hibernate.engine.spi.ActionQueue.addAction(ActionQueue.java:210)
    at org.hibernate.event.internal.AbstractSaveEventListener.addInsertAction(AbstractSaveEventListener.java:324)
    at org.hibernate.event.internal.AbstractSaveEventListener.performSaveOrReplicate(AbstractSaveEventListener.java:288)
    at org.hibernate.event.internal.AbstractSaveEventListener.performSave(AbstractSaveEventListener.java:194)
    at org.hibernate.event.internal.AbstractSaveEventListener.saveWithGeneratedId(AbstractSaveEventListener.java:125)
    at org.hibernate.jpa.event.internal.core.JpaPersistEventListener.saveWithGeneratedId(JpaPersistEventListener.java:84)
    at org.hibernate.event.internal.DefaultPersistEventListener.entityIsTransient(DefaultPersistEventListener.java:206)
    at org.hibernate.event.internal.DefaultPersistEventListener.onPersist(DefaultPersistEventListener.java:149)
    at org.hibernate.event.internal.DefaultPersistEventListener.onPersist(DefaultPersistEventListener.java:75)
    at org.hibernate.internal.SessionImpl.firePersist(SessionImpl.java:807)
    at org.hibernate.internal.SessionImpl.persist(SessionImpl.java:780)
    at org.hibernate.internal.SessionImpl.persist(SessionImpl.java:785)
    at org.hibernate.jpa.spi.AbstractEntityManagerImpl.persist(AbstractEntityManagerImpl.java:1181)
    ... 1 more
Caused by: java.sql.SQLException: Parameter index out of range (1 > number of parameters, which is 0).
    at com.mysql.jdbc.SQLError.createSQLException(SQLError.java:998)
    at com.mysql.jdbc.SQLError.createSQLException(SQLError.java:937)
    at com.mysql.jdbc.SQLError.createSQLException(SQLError.java:926)
    at com.mysql.jdbc.SQLError.createSQLException(SQLError.java:872)
    at com.mysql.jdbc.PreparedStatement.checkBounds(PreparedStatement.java:3367)
    at com.mysql.jdbc.PreparedStatement.setInternal(PreparedStatement.java:3352)
    at com.mysql.jdbc.PreparedStatement.setInternal(PreparedStatement.java:3389)
    at com.mysql.jdbc.PreparedStatement.setNull(PreparedStatement.java:3428)
    at org.hibernate.type.descriptor.sql.BasicBinder.bind(BasicBinder.java:77)
    at org.hibernate.type.AbstractStandardBasicType.nullSafeSet(AbstractStandardBasicType.java:282)
    at org.hibernate.type.AbstractStandardBasicType.nullSafeSet(AbstractStandardBasicType.java:277)
    at org.hibernate.type.AbstractSingleColumnStandardBasicType.nullSafeSet(AbstractSingleColumnStandardBasicType.java:56)
    at org.hibernate.persister.entity.AbstractEntityPersister.dehydrate(AbstractEntityPersister.java:2843)
    at org.hibernate.persister.entity.AbstractEntityPersister.dehydrate(AbstractEntityPersister.java:2818)
    at org.hibernate.persister.entity.AbstractEntityPersister$4.bindValues(AbstractEntityPersister.java:3025)
    at org.hibernate.id.insert.AbstractReturningDelegate.performInsert(AbstractReturningDelegate.java:57)
    ... 20 more

There's not necessarily a field mapping to the discriminator column, because for any specific concrete entity, its type discriminator value is basically a constant.

Environment

  • Java Persistence API 2.1
  • Hibernate 4.3.1
  • MySQL Connector 5.1.36

Tuesday, June 30, 2015

ADF - Time Zone for History Columns

In my last post of the time zone series - Time Zone for Oracle JDBC Driver, I introduced how the Oracle JDBC Driver processes date values with regards to time zones. As a special note, in this post, I will introduce how time zones affect the ADF Business Components 'Date' history columns, specifically, "Created On" and "Modified On" columns.

Here's the description from the official document (see the resources below):

  • Created On: This attribute is populated with the time stamp of when the row was created. The time stamp is obtained from the database.
  • Modified On: This attribute is populated with the time stamp whenever the row is updated/created.

So, the time stamp is obtained from the database (when there is a connection), rather than JVM in which ADF is running. Basically, an appropriate query will be executed in the database to get the current database time; then the value is returned by JDBC and converted to appropriate Java Date type. In this process, the rules introduced in my last post apply.

For example, for Oracle Database, the query (see resources below) would be like this:

select sysdate from dual

Whenever an entity object is about to initialize or update its history columns, the current transaction object is inquiried about the current database time. The transaction object executes the query statement and returns the timestamp obtained as the result from the database (for performance benefit, the query statement is executed only for the first time, and then a difference between the database time and JVM time is saved and added to the JVM time to get a result for a subsequent request).

Now it's clear, to get correct history columns, we need make sure both the database time zone and JVM time zone are configured correctly. Typically, both of them should be configured to be UTC time zone, and then we can use converters for UI components to display date values or accept user input for date values in any other time zones appropriate, as introduced in my another post, ADF - Time Zone for af:convertDateTime.

Resources

Monday, March 23, 2015

Time Zone for Oracle JDBC Driver

In my last post - Time Zone for af:convertDateTime, I introduced how the date values are passed around in an typical ADF application, and specifically, how the ADF Faces handles the date values conversion with respect to the time zone configuration. To review it, let's take a look at this figure again:

Image: Date Data Handling

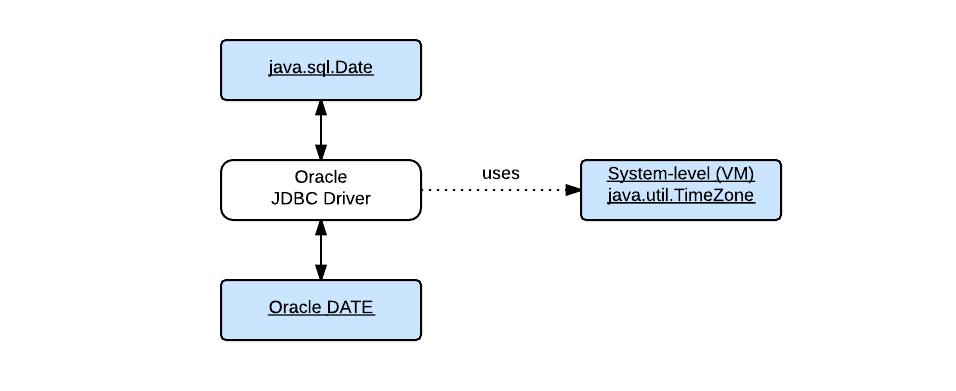
In this post I will be talking about another part of the puzzle - how the Oracle JDBC driver processes date values with regards to time zones. It can be illustrated as the following simple figure:

Image: Oracle JDBC Driver and Time Zone

As shown in the figure, this post will use java.sql.Date (or simply Date in monospace type) and the Oracle DATE datatype (or simply DATE in monospace type) for the discussion. The term "date value" will be used for general purposes.

Oracle Database stores date values in its own internal format. A DATE value is stored in a fixed-length field of seven bytes, corresponding to century, year, month, day, hour, minute, and second. When a date value goes from the application to the database; and out of the database back to the application. It works like this, basically:

  1. A java.sql.Date value is created to hold the date value, and it's in the time zone GMT.
  2. The Date value is sent to the Oracle JDBC Driver, and the driver converts it to the Oracle DATE value and passes it to the database.
  3. The Oracle JDBC Driver retrieves the DATE value out of the datbase, converts it back to the java.sql.Date value.

The Java Date value carries the time zone information implicitly which is always GMT by definition; but the Oracle DATE datatype does not. For Oracle JDBC Driver to convert the value between these two datatypes, another time zone must be specified in some way as the source or destination time zone. If you just want a quick answer, here is it: Oracle JDBC Driver will use the default time zone of the Java VM if it's not explicitly specified.

The key lies in the class oracle.sql.Date, which provides conversions between the Oracle DATE datatype and the Java java.sql.Date (and java.sql.Time, java.sql.Timestamp). Specifically, I'll talk about its two overloaded methods used to convert the Oracle DATE value into the Java Date value. The reverse conversions are handled by its constructors with the same ideas shared.

One of methods is:

public static Date toDate(byte[] date, Calendar cal)

And another one is:

public static Date toDate(byte[] date)

Calling the second one is simply equivalent to call toDate(date, null). Let's focus on the first one. This method accepts two parameters. The first parameter represents the Oracle DATE value to be converted with each byte in the array corresponding to each field in the internal format of the Oracle DATE datatype (that seven-byte, fixed-length format). For the other parameter, it's documented as this:

cal - Calendar which encapsulates the timezone information to be used to create Date object

Here is how this method works:

  1. A new Calendar instance is created using the TimeZone encapsulated in the specified Calendar parameter (cal1 = Calendar.getInstance(cal.getTimeZone())). In case the Calendar parameter is null, use the default time zone (cal1 = Calendar.getInstance()).
  2. Populate each field of the new Calendar instance with the value of each corresponding field in the byte array.
  3. Create and return a new java.sql.Date object using the long value of the time returned from the populated Calendar instance (new java.sql.Date(cal1.getTime().getTime())).

In summary, Oracle JDBC Driver interprets the date values retrieved from the database as in the time zone of the Java VM by default. The values that are actually loaded into the Java Date values may vary depending on your Java VM, and vice versa.

Series on Time Zone

Environment

  • JDeveloper 12.1.3.0.0 Build JDEVADF12.1.3.0.0GENERIC_140521.1008.S
  • Oracle Database 12.1.0
  • Oracle JDBC 12.1.0
  • Mac OS X Version 10.10

Resources

Friday, March 20, 2015

ADF - Time Zone for af:convertDateTime

In the last post about configuring WebLogic Server time zone, I mentioned one of reasons you do it is to configure the default time zone for ADF Faces to convert date and time for input and output components. This post will focus on it - how the ADF Faces convertDateTime converter and the af:convertDateTime tag work with the time zone configuration in detail. This is only the first piece of the puzzle. Hopefully, I can put other pieces together to complete the puzzle with another two or more subsequent posts.

Here you can find the Source Code of the sample application or Download ZIP of it.
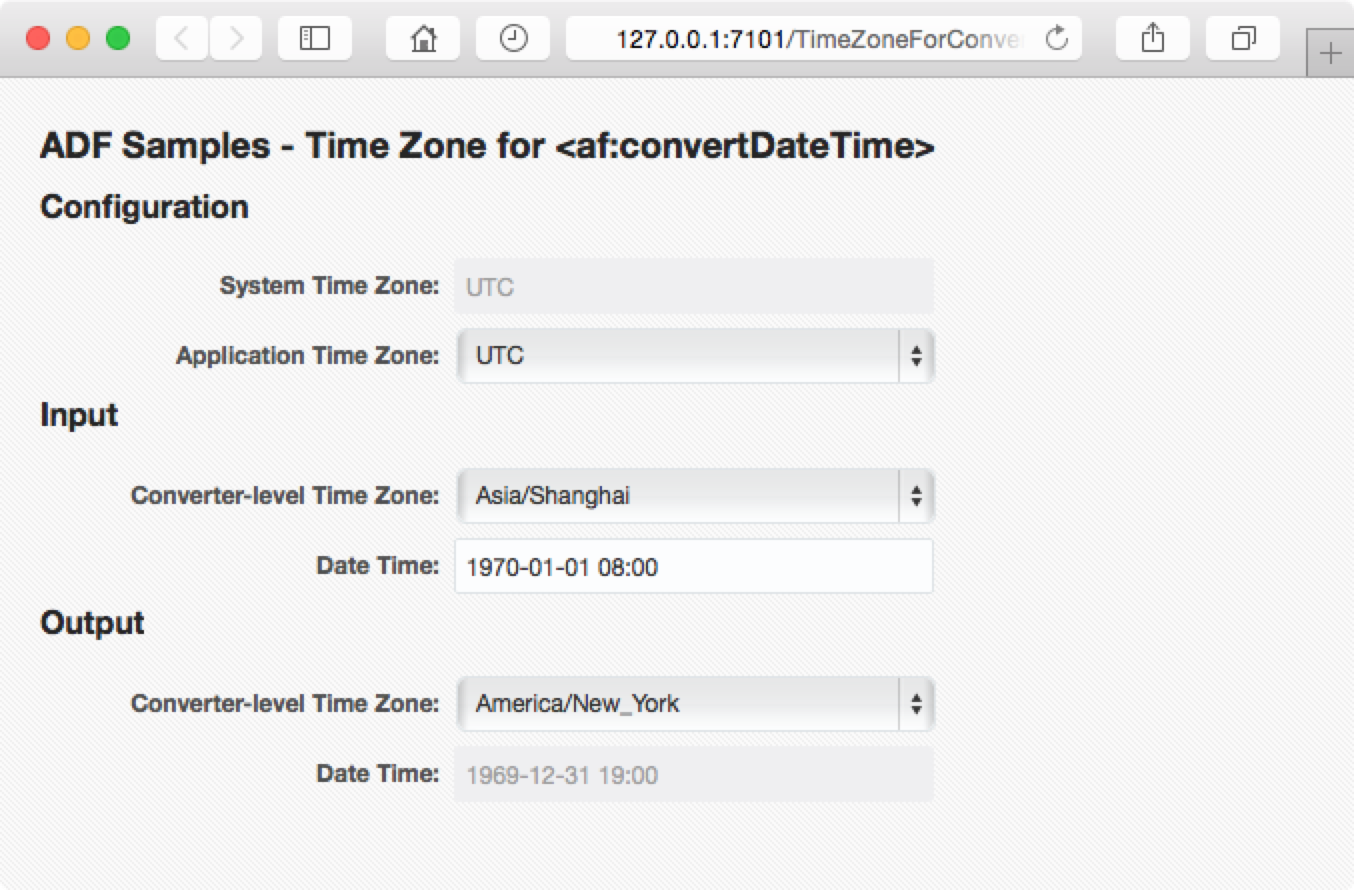
Image: ADF Samples - Time Zone for af:convertDateTime

To make it easier, I'm using java.util.Date in the discussion and the sample application, and Oracle data type DATE in some figures. The basic idea applies to java.sql.Date, etc.

In Java, the class java.util.Date represents a specific point in time. As per the javadocs for one of its constructors - Date(long date):

Allocates a Date object and initializes it to represent the specified number of milliseconds since the standard base time known as "the epoch", namely January 1, 1970, 00:00:00 GMT.

Clearly, the class Date represents a determinate point in time which is in the time zone GMT. To display a Date, we need a converter or a formatter to turn the Date into a String which represents the "wall clock time" local to a specific time zone. When the target time zone changes, the resulting String or the "wall clock time" could change, but the value of the Date does not change in this process.

The following figure illustrates how the date and time data passes through a typical ADF application:
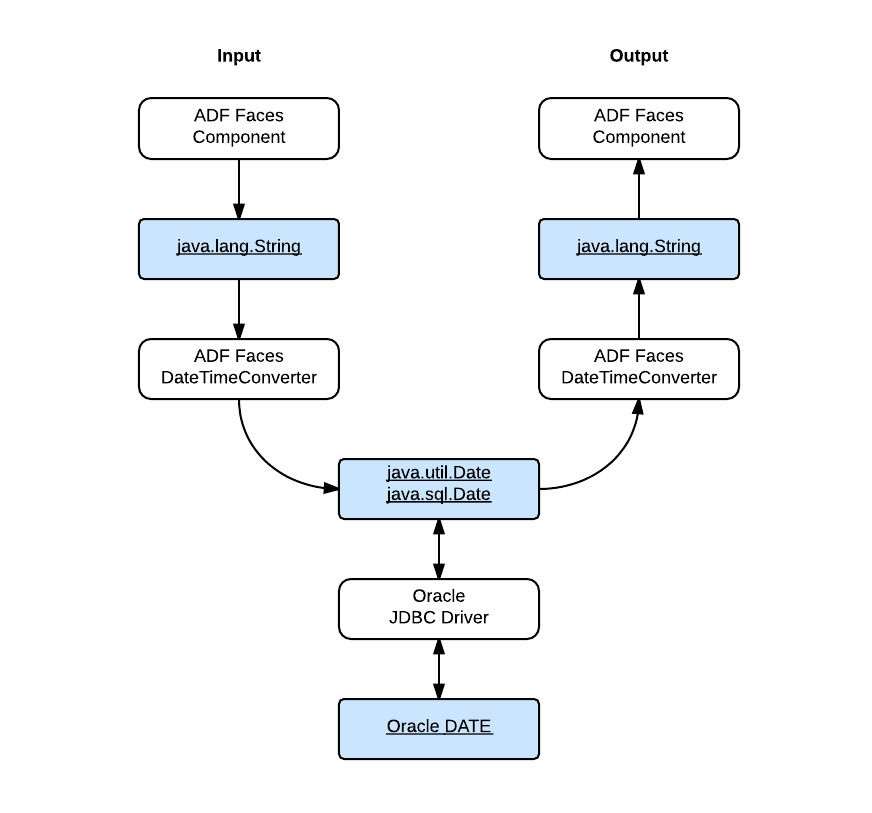
Image: Date Data Handling

  • The ADF Faces component accepts the user input as a String value and convert it into a Java Date value with a DateTimeConverter.
  • The Oracle JDBC driver passes the Date value into the database as an Oracle DATE value.
  • For output, the JDBC driver retrieves the Oracle DATE value out of the datebase as a Java Date value.
  • The ADF Faces component display the date and time after converts the Java Date value into a String value with a DateTimeConverter.

I'll talk about the JDBC part in my next post, and here will focus on how the time zone configuration comes into play in the view part:
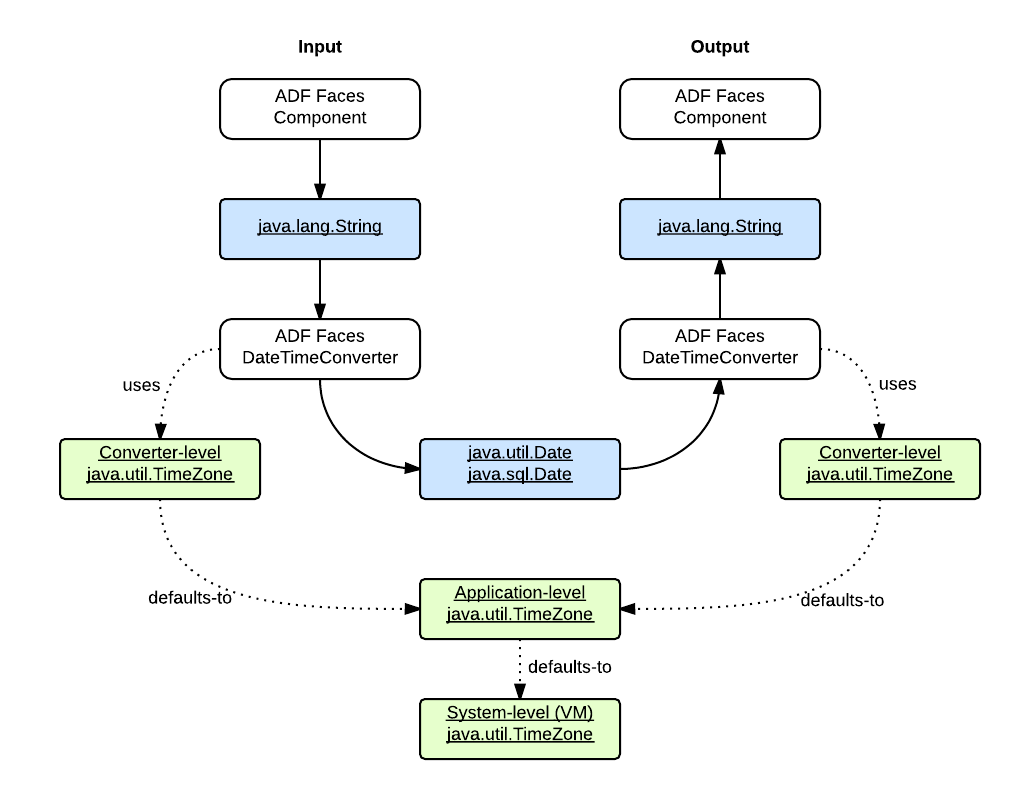
Image: View Layer Time Zone

When an ADF Faces component works with a DateTimeConverter, a java.util.TimeZone object can be configured with it, as shown in the following code snippet from the sample application:

<af:inputText 
        id="it_dt"
        label="Date Time: "
        value="#{userBean.dateTime}" autoSubmit="true">
    <af:convertDateTime 
        pattern="yyyy-MM-dd HH:mm" 
        timeZone="#{userBean.inputTimeZone}"/>
</af:inputText>

Here's the description from ADF RichClient API - <af:convertDateTime> for the timeZone attribute:

Time zone in which to interpret any time information in the date string. If not set here, picks this value from trinidad-config.xml configuration file. If not defined there, then it is defaulted to the value returned by TimeZone.getDefault(), which is usually server JDK timezone.

When the component is used for user input, the TimeZone object specifies the source time zone in which the date string should be interpreted, and convert the String input value into a Date value which is in the destination time zone GMT. When the component is used for output, the TimeZone object specifies the destination time zone, and the Date value is converted into a String representing the local date and time in the time zone specified by the TimeZone object.

You can configure the time zones in three levels:

  • System-level time zone
  • Application-level time zone
  • Converter-level time zone

The system-level time zone can be configured as described in my last post - Configuring the Time Zone with WebLogic Server. The application-level time zone can be configured like this as in the sample application:

<trinidad-config xmlns="http://myfaces.apache.org/trinidad/config">
  <time-zone>#{applicationBean.applicationTimeZone}</time-zone>
</trinidad-config>

The converter-level time zones can be configured with business-specific time zones or user preference time zones according to your application requirement. For example, in an application displaying a flight's departure time and arrival time, two different time zones for the departure airport and arrival airport respectively can be used. That's the business-sepcific time zone approach. You can also support the user preference time zones in this case as an user-friendly feature.

This post covers how the time zones participate in the date values processing in the ADF Faces view layer. In the next post, I'll introduce what happens when the date values are accessed with the Oracle JDBC driver.

Special Note for the ADF prior to 12c

In the ADF 11g, the timeZone attribute of the af:convertdateTime is documented as this:

Time zone in which to interpret any time information in the date string. If not set here, picks this value from adf-faces-config.xml configuration file. If not defined there, then it is defaulted to GMT.

Series on Time Zone

Sample Application

Environment

  • Oracle Alta UI
  • JDeveloper 12.1.3.0.0 Build JDEVADF12.1.3.0.0GENERIC_140521.1008.S
  • Safari Version 8.0
  • Mac OS X Version 10.10

Resources
Monday, March 16, 2015

Configuring the Time Zone with WebLogic Server

In order to properly handle the date and time data in your ADF applications, you probably need to configure the WebLogic Server time zone, for the reasons including but not limited to:

  • Configure the default time zone for <af:convertDateTime> used by input and output components.
  • Configure the time zone that affects how the Oracle JDBC driver handles the date and time data.

This post introduces how to configure the time zone with an integrated or a standalone WebLogic Server, or the ADF Model Tester.

Integrated WebLogic Server and ADF Model Tester

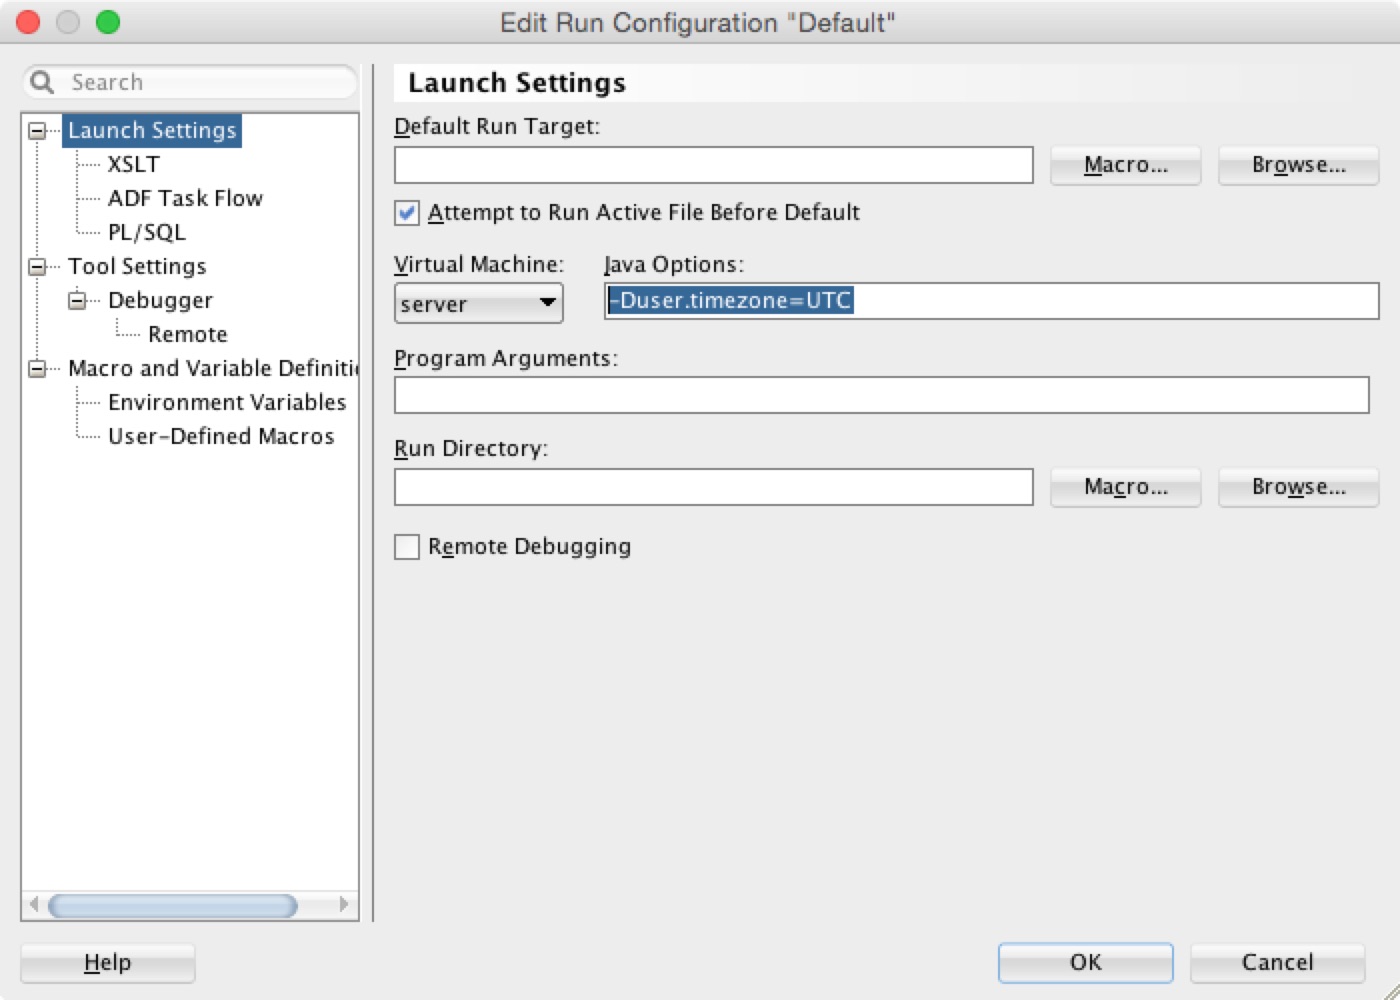
When you are running and testing your application using an Integrated WebLogic Server, or testing your model project with the ADF Model Tester you can configure the time zone by adding the following system property to the Java Options on the Launch Settings page in the Edit Run Configuration window:

-Duser.timezone=UTC

To do this:

  1. Select the project in the Applications window.
  2. From the main menu, choose Application > Project Properties
  3. Select Run/Debug.
  4. Choose to Edit the selected run configuration (a default run configuration is created for each new project).
  5. Add the time zone system property to Java Options

Image: Edit Run Configuration

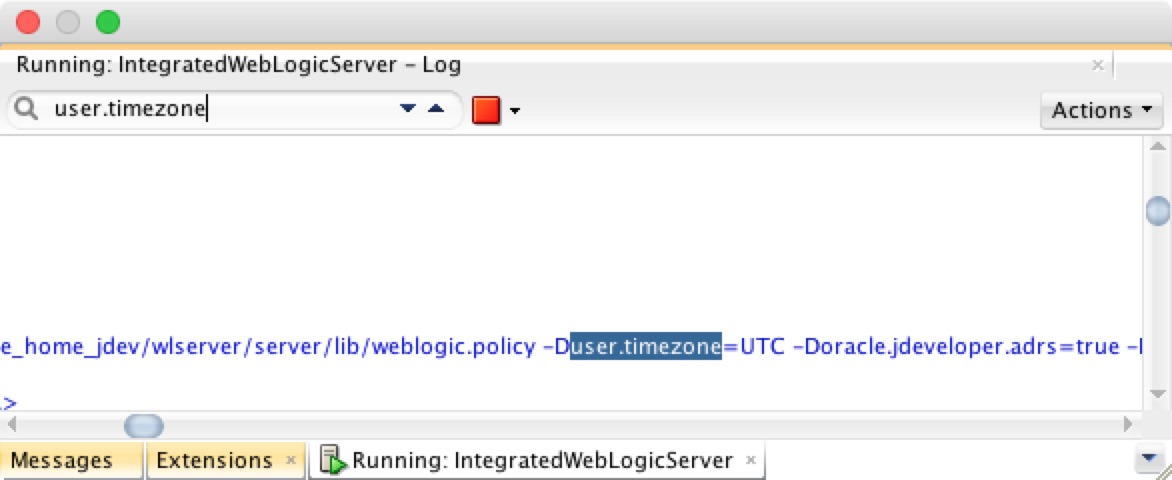
The configuration will apply when the Java program is launched from JDeveloper, for example the Integrated WebLogic Server and the ADF Model Tester. To confirm it, you can look for the system property in the Log window after the program is launched:

Image: Log Window

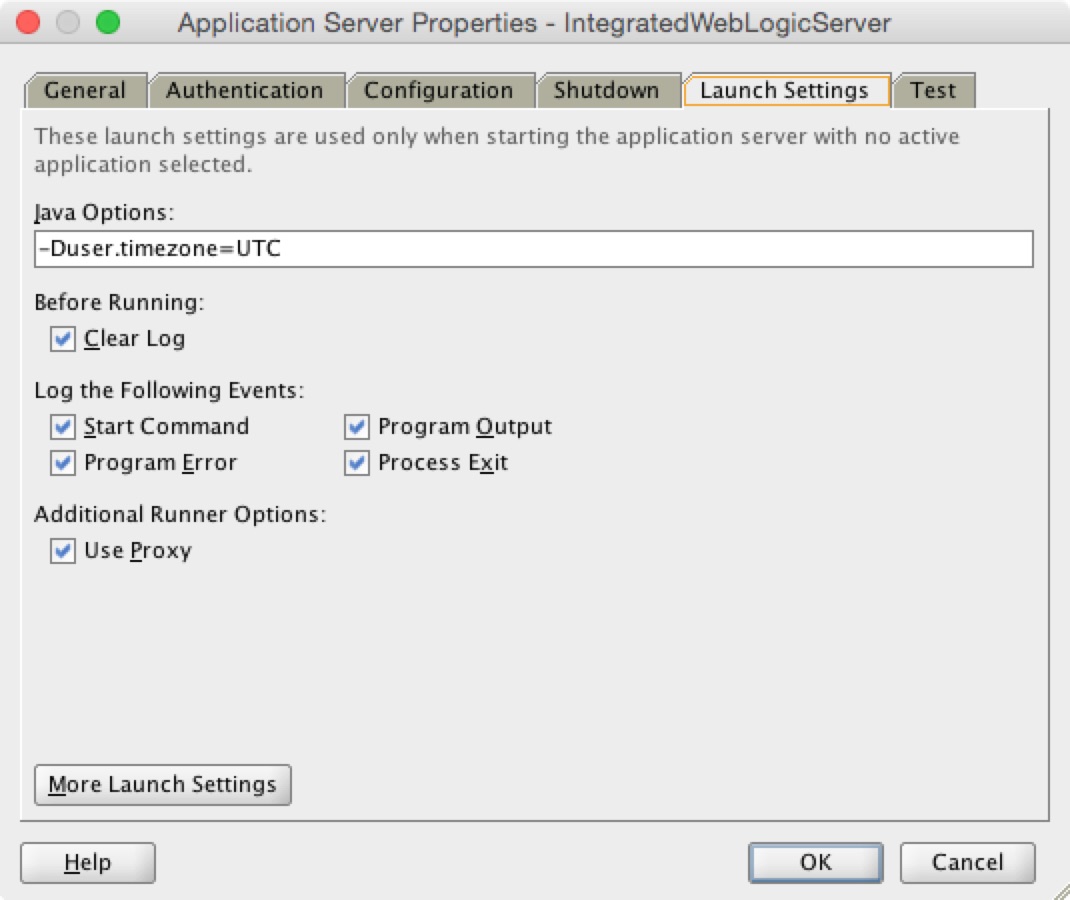
Another way to configure the Integrated WebLogic Server time zone is to set it by modifying the properties of the integrated application server:

  1. In the Application Servers window, right-click the integrated application server (the default instance is called IntegratedWebLogicServer), choose Properties.
  2. Select Launch Settings tab.
  3. Add the time zone system property to Java Options

Image: Application Server Properties

Please note that the Launch Settings of the Application Server Properties are used only when the server starts with no application selected (effectively meaning no application is open in the Applications window).

Caution: when the server starts with no application selected, and then open the application and run it against the server, the Launch Settings defined in the Application Server Properties will be used; the Java Options defined in the run configuration of the project will be ignored.

Standalone WebLogic Server

To configure the time zone with a standalone WebLogic Server instance, if you use a WebLogic Server script to start servers, you can edit the JAVA_OPTIONS in the script to set the system property, see "Specifying Java Options for a WebLogic Server Instance"; if you use the Node Manager to start servers, you can set Java Options for each server instance in the Oracle WebLogic Server Administration Console, see "Set Java options for servers started by Node Manager".

Series on Time Zone

Resources:

Tuesday, February 24, 2015

BEA-141297 - Could not get the server file lock

While starting the WebLogic Administration Server or a Managed Server, you might encounter the following error that prevents the server from starting up:

<Feb 9, 2015 1:40:34 PM CST> <Info> <Management> <BEA-141297> <Could not get the server file lock. Ensure that another server is not running in the same directory. Retrying for another 60 seconds.>

This is because the server lock file is left behind for some reason from the last run. To fix this error:

  • Navigate to the server-specific tmp directory under your $DOMAIN_HOME directory, in my case, for example: ~/Oracle/config/domains/base_domain/servers/AdminServer/tmp for the Administration Server or ~/Oracle/config/domains/base_domain/servers/wls_server_1/tmp for one of the Managed Servers;
  • Delete the lock file for the server instance, AdminServer.lok for the Administration Server or wls_server_1.lok for the mentioned Managed Server.
  • Start the server instance again.

Monday, February 9, 2015

WebLogic - Native library for the Node Manager

After the WebLogic domain configuration is complete, while starting the Node Manager, you might encounter an error as reported below:

WARNING: NodeManager native library could not be loaded to write process id
java.lang.UnsatisfiedLinkError: no nodemanager in java.library.path
    at java.lang.ClassLoader.loadLibrary(ClassLoader.java:1886)
    at java.lang.Runtime.loadLibrary0(Runtime.java:849)
    at java.lang.System.loadLibrary(System.java:1088)
    at weblogic.nodemanager.util.UnixProcessControl.<init>(UnixProcessControl.java:25)
    at weblogic.nodemanager.util.ProcessControlFactory.getProcessControl(ProcessControlFactory.java:23)
    at weblogic.nodemanager.server.NMServer.writeProcessId(NMServer.java:253)
    at weblogic.nodemanager.server.NMServer.writePidFile(NMServer.java:230)
    at weblogic.nodemanager.server.NMServer.<init>(NMServer.java:121)
    at weblogic.nodemanager.server.NMServer.main(NMServer.java:505)
    at weblogic.NodeManager.main(NodeManager.java:31)

<Feb 9, 2015 10:19:50 AM CST> <SEVERE> <Fatal error in NodeManager server: Native version is enabled but NodeManager native library could not be loaded>

This is because by default, Oracle enables native libraries for the operating system to be used by the Node Manager, even when the native version is actually not provided for the specific operating system. Here's the statement from the Oracle documentation Administering Node Manager for Oracle WebLogic Server:

Oracle provides native Node Manager libraries for Windows, Solaris, Linux on Intel, Linux on Z-Series, and AIX operating systems.

To fix this error in an unsupported operating system (like Mac OS, in my case), you can simply disable the native version support by updating the configuration setting in the nodemanager.properties file. The file only gets created until the Node Manager has started up once. It's typically in the $DOMAIN_HOME/nodemanager directory. In the file, find the the following setting:

NativeVersionEnabled=true

Update it to be as follow:

NativeVersionEnabled=false

Now, you can start the Node Manager:

nohup ./startNodeManager.sh > nm.out&

Check out the log file, the warning about the NodeManager native library could not be loaded is still there, but the Node Manager should start up successfully after printing out the current configuration settings.

Resources:

Wednesday, January 7, 2015

ADF - The markScopeDirty() method for ADF memory scopes

We have a coding convention of using memory-scoped data in our ADF Faces development - always manage memory-scoped data, such as parameters or state as properties of managed beans. Comparing to putting the data directly into memory scopes, the convention has the following benefits:

  • allows proper documentation
  • allows validation, initialization and logging
  • helps understanding and maintenance.

There is a caveat however, when applying the coding convention to the ADF Faces-specific scopes - page flow scope and view scope.

The ADF Controller uses session scoped objects to hold the page flow scope and view scope. When the high availability (HA) mode is on, the application server will serialize any objects in the session scope and replicate the serialized data within the cluster. To void blind serialization of the page flow scope and view scope, ADF optimizes the process - you have to make sure the framework is aware of changes to one of these ADF scopes by marking the scope as dirty.

If the scope is modified by calling its put(), remove(), or clear() methods, the framework will handle the marking, such that you don't have to care about it when you put data directly into the scope. When the properties of managed beans are used as suggested in our coding convention, then the framework must be notified of changes to the properties. This can be done by the code like this:

Map<String, Object> viewScope = AdfFacesContext.getCurrentInstance().getViewScope();
ControllerContext ctx = ControllerContext.getInstance();
ctx.markScopeDirty(viewScope);

Repeating this for every property of managed beans is surely bad. Hard-coding the scope where the managed beans are put into does not look like a good idea either. These concerns lead to the following solution in the base class for all managed beans:

public static final String VIEW_SCOPE = "view";
public static final String PAGE_FLOW_SCOPE = "pageFlow";
private String scope;

public String getScope() {
    return scope;
}

public void setScope(String scope) {
    if (scope == null || VIEW_SCOPE.equals(scope) ||
        PAGE_FLOW_SCOPE.equals(scope)) {
        this.scope = scope;
    } else {
        throw new IllegalArgumentException("Unsupported ADF scope: " +
                                           scope);
    }
}

public void markScopeDirty() {
    if (this.scope == null) {
        return; // no scope is specified, skip
    }

    String prop =
        ControllerConfig.getCurrentProperty(ControllerProperty.ADF_SCOPE_HA_SUPPORT);
    if (!"true".equals(prop)) {
        return; // support not enabled, skip
    }

    Map<String, Object> scopeObject = null;
    if (VIEW_SCOPE.equals(this.scope)) {
        scopeObject = AdfFacesContext.getCurrentInstance().getViewScope();
    } else if ("pageFlowScope".equals(this.scope)) {
        scopeObject =
            AdfFacesContext.getCurrentInstance().getPageFlowScope();
    } else {
        // should never happen, setScope() has done the validation
    }

    ControllerContext.getInstance().markScopeDirty(scopeObject);

    System.out.println("DEBUG: markScopeDirty for HA [scope=" + scope +
                       "]");
}

Now it's much easier to mark the scope as dirty, simply call the markScopeDirty() method in the property setter method of the managed bean.

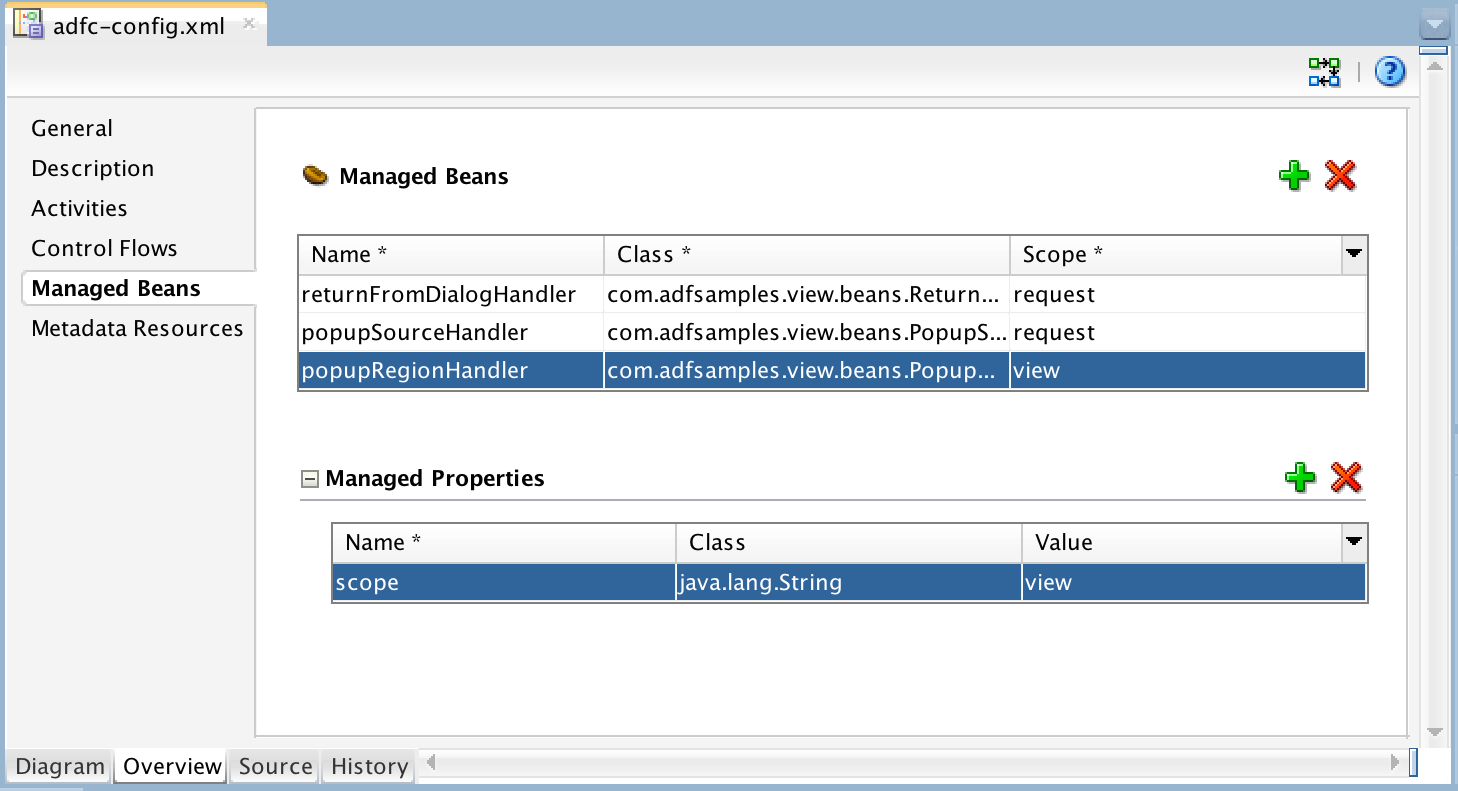
How to set the scope that should be marked? It's recommended to use the scope property as a managed property, e.g. set the scope property right at the point where and when the managed bean is declared to be in that scope:

Image: The scope managed property

Resources: